HOW TO MAKE A AN ANGLED LEDGE
This edge is 4'-0 wide x 11'-0 long and 2'-5 tall at it's tallest.
As with all structures here on DIYskate, you can build it any size you want (or just one side for that matter). But for the material list to be accurate you will need to follow the plans as listed below.
WHERE TO GET SUPPLIES
The wood and hardware can be found at most home improvement stores. Sometimes you can find the steel there as well, I know my local Home Depot carries the coping and threshold material.
If not, you can search the internet for steel fabricators or salvage steel. Personally, I've begun buying my steel from MetalsDepot.com because of their very quick shipping and good prices. I'm not affiliated with them in any way, I just like them and their product.
If this ramp is going to stay outside, it needs to be protected from the elements. A good place to start is with pressure treated lumber, paint and a tarp. You may want to invest in a composite material for the surface too. Such as Skate Lite or Ramp Armor.
Be extra careful when working with treated lumber though, the chemicals used to treat the wood contain a poisonous pesticide.
BUILD IT
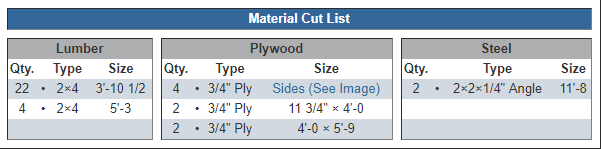
Gather your materials. Start with the 2x4's. Cut twenty two pieces 3'-10 1/2 in length and four pieces at 5'-3. Set them aside. Below is a cut list referencing what else you will need and it's size.
FRAMING THE BOTTOM
Start by framing the two bases, one for each of the angled ledges. Since each side of the angled ledge is the same, i'm only going to illustrate one side until they are joined towards the end.
Make each frame using two of the 5'-3 long 2x4's and two of the 3'-10 1/2 long 2x4's.
It's a good idea to pre-drill the screw locations near the ends with a 3/16" drill bit to keep the wood from splitting, keep that in mind throughout the build.
CUTTING THE SIDES
Cut the sides from a 4x8 sheet of plywood as shown below. They are all identical.
You will need four total, two for each ledge.
ATTACHING THE SIDES
Take the newly cut sides and attach them to the base.
FRAMING THE TOP
Starting at the low end, position a 3'-10 1/2 long 2x4 angled to be flush with the top. Now attach 2x4's at 8 1/2" on center until you reach the high end. Place it on it's side and flush with the top as shown above.
ATTACH LEDGES TOGETHER
Drill two 9/16" holes in the bottom 2x4's about 6" in from the sides. Bolt the ledges together using the 1/2" bolts, nuts and washers.
Since the top 2x4's are angled, you'll want to use 2 1/2" screws to attach them. You could use screws for the bottom of the angled ledges as well but I am a fan of using bolts, easier and stronger in the long run.
CUTTING THE PLYWOOD
The plywood that covers the top and front of the ledge is pretty straight forward, cut it as shown below.
You will want to cut one end of the 5'-9 x 4'-0 piece at a 15 degree angle so each ledge will meet smoothly at the top instead of there being a gap.
COVERING THE LEDGE
With the plywood you just cut, cover the ledge.
Making sure you place the beveled or angled cut edge next to one another on the top.
BENDING THE COPING
On this ledge you will want to bend the coping in the middle so it's one continuous piece, making grinds as smooth as possible. To do this, make two 15 degree cuts on one side of the angle iron as shown below.
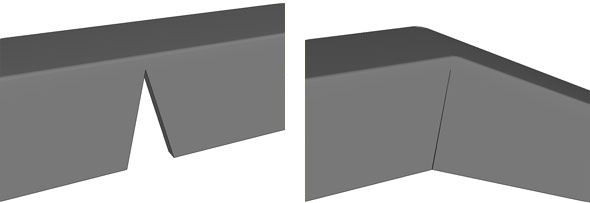
Once cut, you can easily bend it together by hand. Optional: Weld the seam together (but not necessary).
ATTACHING THE COPING
Place the angle iron on the angled ledge. Drill a 3/16" hole on each end on both sides where shown. The top and bottom dimensions are offset so the screws won't hit each other. Drill a total of 24 holes for 12 screws per angle iron.
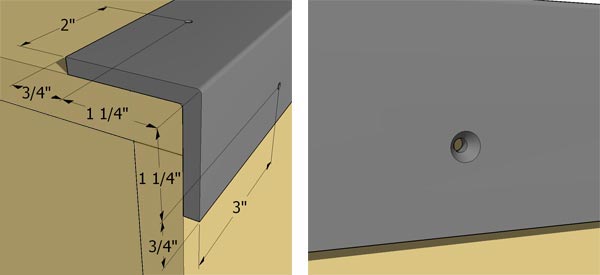
After the holes are drilled, countersink each by using the 3/8" drill bit to drill down just enough so the screw heads are flush with the coping. This will keep your trucks and board from hitting them when you grind or slide.
Do this for the coping on both sides of the ledge.
SKATE IT
There you have it, a finished angled ledge. I haven't made one of these in awhile now and after writing this set of plans, I want to make one as soon as possible. It brings back memories of how fun this ledge is. As with the stair ledge, the trick possibilities are endless and well worth the time and effort it took to build it. Good luck and have fun!