HOW TO MAKE A SKATEBOARD BANK RAMP
Similar to a kicker ramp but it's use is often different, a bank ramp is great for learning flip tricks on. This bank ramp is 8' wide by about 3'-6 tall and 7'-9 in length. It has a 30° slope.
Also, I say "skateboard bank ramp" but this ramp can be used for a BMX bank ramp too. All of my ramps can withstand pretty much anything that can be thrown at them, within reason.
As with all structures here on DIYskate, you can build this bank ramp any size you want. However, for the material list to be accurate, you will need to follow the plans as listed below.
WHERE TO GET SUPPLIES
The wood and hardware can be found at most home improvement stores. Sometimes you can find the steel there as well, I know my local Home Depot carries the coping and threshold material.
If not, you can search the internet for steel fabricators or salvage steel. Personally, I've begun buying my steel from MetalsDepot.com because of their very quick shipping and good prices. I'm not affiliated with them in any way, I just like them and their product.
If this ramp is going to stay outside, it needs to be protected from the elements. A good place to start is with pressure treated lumber, paint and a tarp. You may want to invest in a composite material for the surface too. Such as Skate Lite or Ramp Armor.
Be extra careful when working with treated lumber though, the chemicals used to treat the wood contain a poisonous pesticide.
LUMBER CUT LIST
Gather your materials. Start with the 2x4's and 2x6's. Using the cut list below, cut the lumber and set it aside. It's a good idea to keep everything separate and mark them so you don't mix them up.
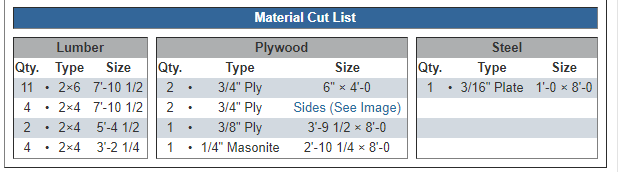
PLYWOOD CUT LIST
Cut the 3/4" plywood for the sides by following the cut list below. Both sides are identical. Also cut two 4' x 6" pieces for the top of the bank as shown.
I like to radius the bottom of the skateboard bank ramp for a less abrupt transition from flat to bank. Using a 2x4 with a screw and pencil as your compass, draw the radius as shown in the illustration below.
Once drawn and cut, use this side as your template to draw and cut the other side.
BUILD IT
Start by building the frame with one 2x4 @ 7'-10 1/2, one 2x6 @ 7'-10 1/2 and four 2x4's @ 3'-2 1/4, as shown below.
FRAMING THE SIDES
Take both of the sides you cut earlier and attach the frame you just built to it, with the 2x6 on top.
Also attach the front 2x4 at this time.
FRAMING THE SIDES CONTINUED
Now attach the ten 2x6's and two 2x4's to the sides spacing them 8" apart, on center except where noted below.
You will also want to double up the 2x6 about 4'-0 down from the top. This is where the 3/8" plywood seam will will meet and the double 2x6's allow a larger surface area for attaching the two sheets.
PLACING THE SUPPORT
Take the remaining two 5'-4 1/2 long 2x4's and attach them to the plywood sides under the 2x6's. These skateboard bank ramps take an enormous amount of abuse and need extra supports to cope with that abuse.
The supports relieve stress from the screws holding up the 2x6's and the 2x6's are less likely to break than 2x4's, although I have seen it happen.
ATTACH THE PLYWOOD - TOP
You're done framing the skateboard bank ramp, the next step is to take the two 4'-0 x 6" x 3/4" strips you cut earlier and place them on the top, 2x6 support.
ATTACH THE PLYWOOD - BOTTOM LAYER
Take a sheet of 3/8" and attach it to the framed bank, pushing it flush against the 3/4" strips on top. You want to screw from the top down placing a screw every foot or so making sure you screw into the 2x6's.
Next, take another 3/8" sheet, cut it to 3'-9 1/2 x 8' and push it flush against the previous 3/8" sheet to finish the bottom layer. Again screw from the top down, placing the screws about a foot apart.

ATTACHING THE PLYWOOD - MIDDLE LAYER & MASONITE
Next take two more sheets of the 3/8" plywood, lay them cross grain to the bottom layers and screw them in place using the same screw pattern as before.
Once the 3/8" plys are attached, cut a strip of masonite 6" x 8'-0 and cover the 3/4" ply on the top.
Now lay a full 4' x 8' sheet of masonite on the 3/8" ply surface, pushing it flush against the masonite stip on top. Unlike the 3/8", you'll need to countersink the masonite with a 3/8" drill bit or a countersink bit.
Then, just like the screws in the previous plys, you will want to start at the top and work your way down, except this time put the screws about 6" to 8" apart instead of a foot.
Now attach a 2'-10 1/4 x 8'-0 sheet of masonite flush against the other sheet.
FINISH AND SKATE IT
Last, attach the 1'-0 wide x 28'-0 x 3/16" thick sheet metal to the bank (Depending on how hard you are on the structure, you may be able to get away with thinner steel - down to 14 gauge or so). Drill five, 3/16" evenly spaced holes then countersink the screw locations with a 3/8" drill bit ensure the screws are flush.
his ramp is a beast and should have no problem accommodating skaters and bikers alike. I plan on drawing up a suitable flyout launch for the bikers too, but I have a few things to get to before then.
Until then, enjoy your new bank ramp.
