CHICAGO BARRIERS
Alright, I have a buddy named Kevin aka the Skate Pirate. He sends me an email the other day saying that he'd like to make a Jersey Barrier that has "one side traditional and the other slightly mellowed and less jerky! the best of both worlds".
So I figured what the hell. And alas, the Chicago Barrier was born.
You see, Kevin is from Chicago, Illinois (Aurora).
As with all structures here on DIYskate, you can build this Chicago barrier any size you want. But for the material list to be accurate you will need to follow the plans as listed below.
WHERE TO GET SUPPLIES
The wood and hardware can be found at most home improvement stores. Sometimes you can find the steel there as well, I know my local Home Depot carries the coping and threshold material.
If not, you can search the internet for steel fabricators or salvage steel. Personally, I've begun buying my steel from MetalsDepot.com because of their very quick shipping and good prices. I'm not affiliated with them in any way, I just like them and their product.
If this ramp is going to stay outside, it needs to be protected from the elements. A good place to start is with pressure treated lumber, paint and a tarp. You may want to invest in a composite material for the surface too. Such as Skate Lite or Ramp Armor.
Be extra careful when working with treated lumber though, the chemicals used to treat the wood contain a poisonous pesticide.
Materials needed
- 4 - 4x8, 3/8" plywood
- 1 - 4x8, 3/4" plywood
- 7 - 2x4's, 8' long
- 1 - 2x6's, 8' long
- 1 - 5lb box of 1 5/8" screws
- 1 - 1lb box of 2 1/2" screws
- 1 - 2x2x3/16" angle iron
Tools needed
- Tape Measure & Pencil
- Circular & jig saw
- Drill w/ philips bit
- Assorted drill bits
- Chalkline
Approximate Cost: $180
Easy | | | | | Difficult
BUILD IT
Gather all your materials. Start with the 2x4's. Cut 7 pieces at 7'-10 1/2 in length. Set them aside. Below is a cut list referencing what else you will need and it's size.

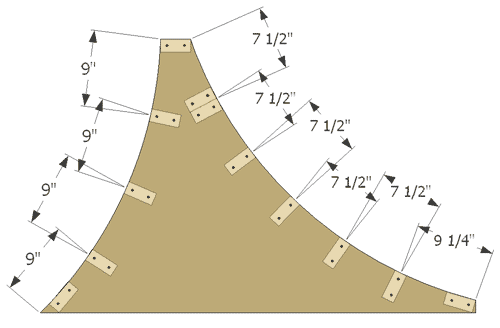
PLYWOOD LAYOUT
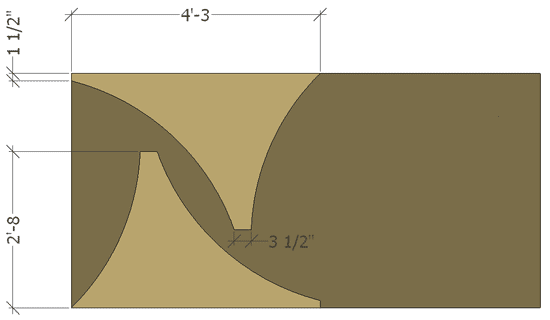
The plywood layout diagram above shows you where to cut the sides and their measurements.
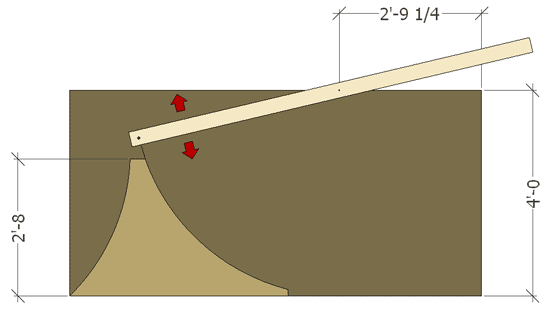
MAKING THE 2X4 COMPASS
Using an 2x4 that is 5'-0 or longer, drill a hole that's the diameter of a pencil about 2" in from the end.

Then measure from the hole you just drilled, out the distance of the transition radius. In this case, 4'-0. Place a screw there but don't go all the way through the 2x4 yet.
CUT THE TRANSITION
Carefully cut the transition using the lines you just drew. Once cut, you can use this transition as your template to trace onto the plywood and cut out the other side.
MARKING THE PLYWOOD
With the 2x4 you just made, screw the screw into the plywood where shown below. You will need an additional piece of wood to attach the 2x4 to as it's location is on the edge of the 4x8 sheet of plywood.
Now guide your pencil with the 2x4 compass to clearly draw the transition radius on the 3/4" ply.
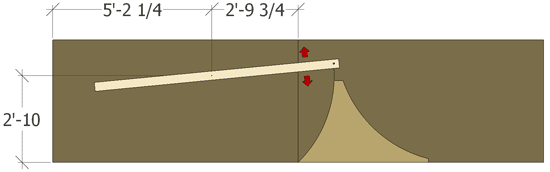
Once done, take one of your 3/8" sheets and place it on the left side as shown. Use this piece of ply to attach your 2x4 compass to and draw out the other side of the transition the same way as you did the right side using the dimensions provided above.
Notice how the same 2x4 compass allows you to have two seemingly different transitions on either side just by changing where you draw the transition from. The more "mellow" side will act more like a quarter pipe but is plenty steep to challenge the best of us.
FRAMING THE SIDES
Frame the chicago barrier using three of the 7'-10 1/2 long 2x4's for the top and bottom as shown .
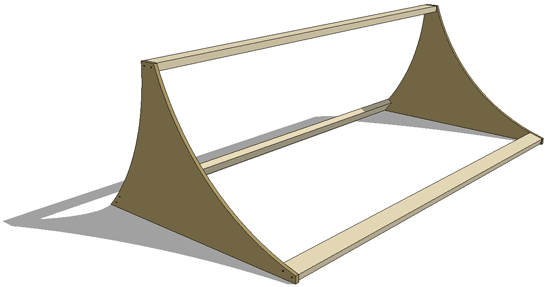
FRAMING THE CENTER
Take three of the remaining 2x4's and frame the steep portion of the barrier by placing them at 9" on center. Then take the last six 2x4's and put them at 7 1/2" apart on center making sure that you double up the 2x4's for the plywood seam near the top as shown.
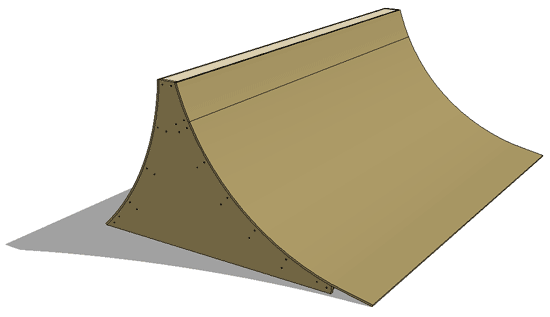
COVERING THE RAMP
The steep side will need a layer of 3/8" plywood that is 2'-11 by 8'-0. The mellow side takes a sheet that is 4'-0 by 8'-0 and a piece at the top that is 7 1/2" by 8'-0. Using 1 5/8" screws, start at the top and place the screws about a foot apart working your way down the ramp. Make sure you hit the studs when your attaching them. Use a chalkline or 2x4 to mark it.
The next 3/8" layers and optional masonite on the mellow side are a bit more complex. I wrote it out and no matter how I worded it, it sounded harder than it actually is.
So here's the easy explanation. You can put angle iron or steel pipe on top for coping. If you choose angle iron, you will want to start the second layer a couple inches down from the top so the angle iron will fit properly. If you choose steel pipe, you can run the second layer all the way to the top. Either way, make the plywood on the mellow side a couple inches longer at the bottom to meet the ground.
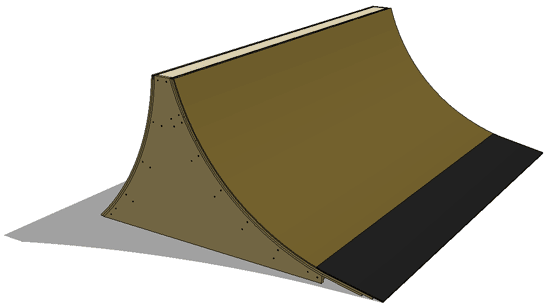
ATTACHING THE MASONITE
Just like the other quarter pipes on this site, It's best to cover them with masonite and a steel threshold. Stop the masonite in the middle of the last 2x4 so the steel threshold has something solid to attach to.
ATTACHING THE ANGLE IRON
With the 3/8" ply screwed down, take two, 2x2x3/16" angle iron at 8' long and attach them to the ramp.
The 3/8" ply will stick out a little bit more than the angle iron unless you place a piece of 1/4" plywood behind the angle iron to build it up. This is completely up to you.
You can also add a piece of 1/4" plywood between the two angle iron pieces to make it flush all the way across, but again, this is optional.
As with all steel that you attach to a ramp, drill a 3/16" hole and countersink to allow the screw head to be flush with the ramp. You will need 3 screws in each leg of each angle iron. Twelve total or six per angle iron, similar to the grind ledge.
ATTACHING THE STEEL PIPE
If you chose to use steel pipe as coping instead, it's actually a bit easier than the angle iron. Just drill out four holes just like a quarter pipe and screw the pipe down snug.
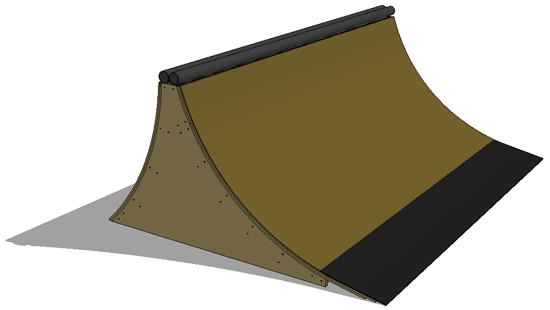
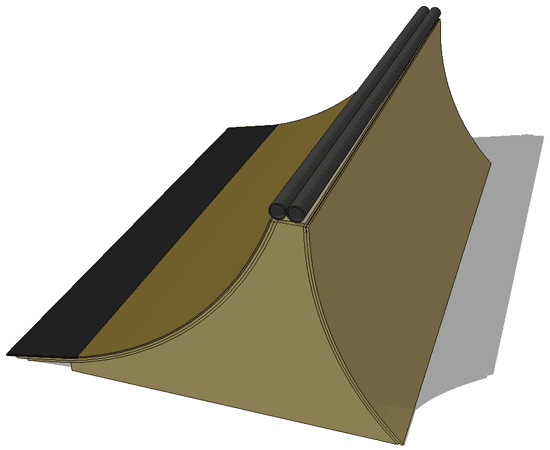
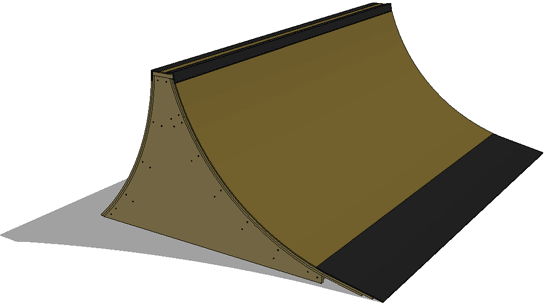
FINISHED
There you go, your very own Chicago Barrier.
I'm going to have to make sure Kevin builds this one, because it looks like it would be a blast to skate. Now I just gotta figure out which type of coping would be the most fun.