HOW TO MAKE A CONCRETE SKATEBOARD MOLD
Concrete skateboard molds are relatively easy to make. However you are limited in your pressing options. You will almost always have to use an actual press, hydraulic or bottle jack.
If you have a press or plan on making one all you need to make a concrete skateboard mold is a uncut skateboard deck, wooden box, the tools listed and concrete.
Four Rapid Set - Cement All pre-mixed 55lb bags are your best bet for making a concrete skateboard mold.
Rapid Set or Hydraulic Cement as it is more commonly known, sets much quicker than most concretes (within 1 hour - which may be too quick, get a friend to help you mix and pour). It also has more strength and very little shrinkage. These characteristics make it perfect for making a concrete skateboard mold. And no, they are not paying me to say this, it's just great for concrete skateboard molds.
If your local hardware store doesn't carry Rapid Set or Hydraulic Cement, you can use many other brands and types. Like Quikrete Fiber Reinforced, or even mix your own.
CUT THE PLY
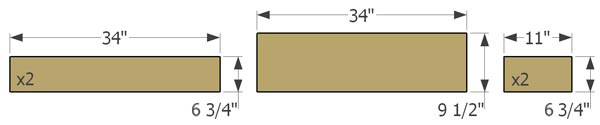
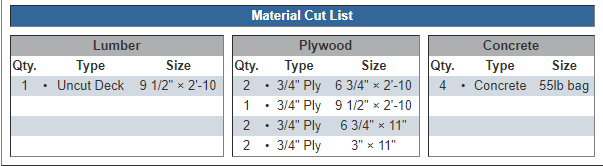
Gather your materials. Start with the 3/4" plywood and cut them to size as shown above. Set them aside. Below is a cut list referencing what else you will need and it's size.
BUILD IT
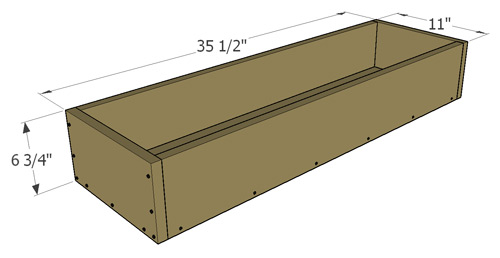
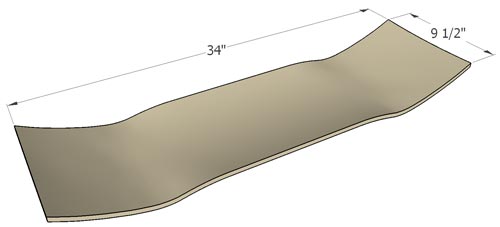
Now, build a box from the 3/4" MDF or plywood that has an inside dimension of 9 1/2" wide x 34" in length x 6" tall. You will want to pre drill the screw locations with a 1/16" drill bit to avoid splitting. Make sure this box square. It is important that all pieces fit together tight.
If you're using a concrete that requires a lengthy setting time, you might want to build two boxes and purchase two uncut decks for convenience.
TRIM
Obtain an uncut skateboard deck. There's a couple places you can go for uncuts, SkatePaige.com and drifterskate.com. I've used skatepaige before and they aren't bad and the price is right. Unfortunately it's almost impossible to get them to return your emails or even let you know if your purchase went through.
Now the newest supplier, Drifter Skateboard Manufacturing, really seems to have their stuff together and are quick and professional. To see more, take a look at their video.
To order an uncut blank through Drifter, email Ryan directly and tell him Jason at DIYskate sent you.
Trim this uncut deck to 9 1/2" x 34" square. This is done by finding the center and measuring out from there. Doing this removes the rough edges and (if done properly) squares the deck for a snug fit in the wooden box.
ASSEMBLE
All right, you should have a box and a squared up deck. Before assembly, sand the skateboard deck using progressively finer sandpaper until smooth.
Place this deck bottom side up in the box, again, this should be a snug fit. Pre drill and put about four screws into the deck on both sides. Measure and drill carefully for screw placement.
You may want to use some sort of "filler" under the deck, such as sand, expandable foam etc... to keep the weight of the concrete from bowing the deck.
THREADED ROW
Take the 3" x 11" slats and drill two, 9/16" holes in each slat where shown. Attach them to the finished box. These are to hold the threaded rods in place while the concrete is poured.
You will need four threaded rods per mold, 5" long. Thread a nut onto each rod, 2" down and place them into the slats as shown. These will allow you to bolt this concrete mold to the press once finished. These are the bottom mold slats, the hole locations differ from the top mold slats.
PREPARE
Place the box on a level surface. Spray the inside of the wooden box with WD-40 and wipe it down so the concrete will easily separate from the wood. Gather the re-bar / wire and make a frame that you can attach to the threaded rod with wire.
MIX
Mix your concrete per instructions on the bag. Most concrete mixtures are temperature sensitive, so take the necessary steps to allow your mold the best chance for success.
FILL
Some of these concretes are difficult to mix and set up pretty quick, so having a friend to help you will save your butt here. Once mixed, pour your concrete mixture into the wooden box
Once full, you will need to immediately vibrate the concrete to release the air bubbles. I used a hammer drill to vibrate through the sides, a palm sander and even my scroll saw, which when turned on shakes the crap out of anything on my workbench. Use your imagination.
CURE
Follow the manufacturers instructions to allow the concrete to cure. You will most likely have to keep the surface wet for a half hour or longer.
Once the concrete cures, remove the screws and take apart the wooden box, removing the concrete skateboard mold.
You may have to pry the wood panels from the concrete. Be careful not to chip or crack the concrete if using tools to assist in the removal. Also, the concrete will most likely be hot, like real hot so be aware of that.
REBUILD
You should be able to use the original box and uncut deck for the top mold too. Clean them up a little bit and reassemble, with the deck bottom side down.
Just like the bottom mold, pre drill and put about four screws into the deck on both sides. Measure and drill carefully for screw placement.
You may want to use some sort of "filler" under the deck, such as sand, expandable foam, etc... to keep the weight of the concrete from bowing the deck.
THREADED ROD
Cut two, 3" x 11" slats out of 3/4" plywood. Drill two, 9/16" holes in each slat where shown. Attach them to the finished box.
You will need four threaded rods per mold, 5" long. Thread a nut onto each rod, 2" down and place them into the slats as shown. These will allow you to bolt this concrete mold to the press once finished.
These are the top mold slats, the hole locations differ from the bottom mold slats.
PREPARE , MIX , FILL AND CURE
The steps above for the bottom mold are the same for the top, follow them exactly. Then allow the concrete to cure the same way as before and remove that bad boy from the mold.
Once again be careful during the removal. No need to get in a rush a ruin all that hard work.
FINISHED
Viola! You're done. If you took all the necessary steps, your concrete skateboard mold should have a smooth, pit free finish and is ready to start turning out perfect decks.
These molds were designed for this press. However, you can purchase a press from an industrial store and adapt it to fit, good luck and have fun.