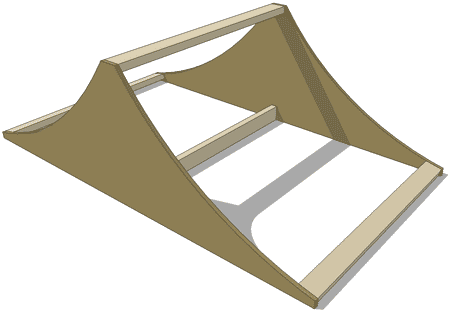
HOW TO MAKE A MICRO SPINE RAMP
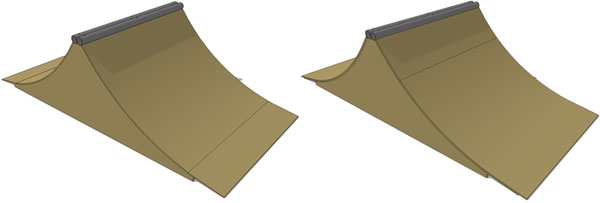
Please welcome another micro ramp, the micro spine! I love these little ramps, they're simple to build, great to learn stuff on and much easier to move than a larger ramp.
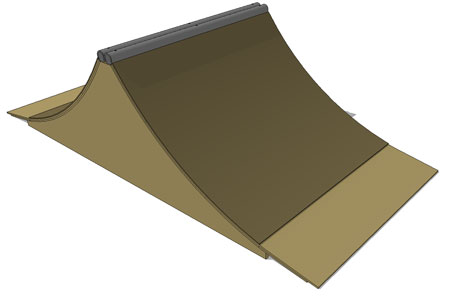
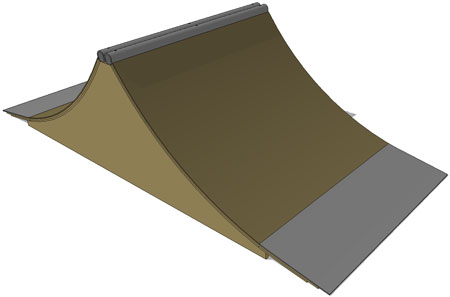
This spine ramp is 2'-6 tall by 4' wide. Because of it's small size, the quarter pipe is great for basements, garages and driveways.
As with all structures here on DIYskate, you can build this spine ramp any size you want. But for the material list to be accurate you will need to follow the plans as listed below.
WHERE TO GET SUPPLIES
The wood and hardware can be found at most home improvement stores. Sometimes you can find the steel there as well, I know my local Home Depot carries the coping and threshold material.
If not, you can search the internet for steel fabricators or salvage steel. Personally, I've begun buying my steel from MetalsDepot.com because of their very quick shipping and good prices. I'm not affiliated with them in any way, I just like them and their product.
If this ramp is going to stay outside, it needs to be protected from the elements. A good place to start is with pressure treated lumber, paint and a tarp. You may want to invest in a composite material for the surface too. Such as Skate Lite or Ramp Armor.
Be extra careful when working with treated lumber though, the chemicals used to treat the wood contain a poisonous pesticide.
BUILD IT
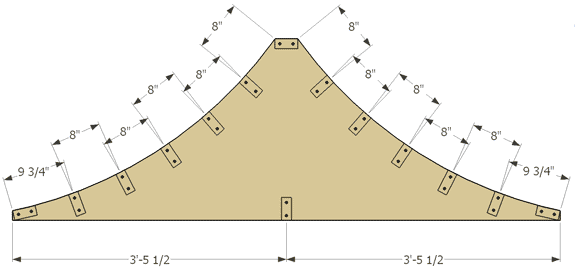
Gather all your materials. Start with the 2x4's. Cut 13 pieces at 3'-10 1/2 in length (you will get 2 out of each 8' long 2x4). Set them aside. Below is a cut list referencing what else you will need and it's size.
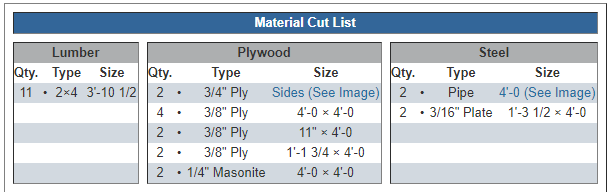
PLYWOOD LAYOUT
Above you will find a plywood layout illustration, it shows the sides of the micro spine ramp being cut from a single sheet of 3/4" plywood.
You can draw one as described below, then trace the next one off of the first.
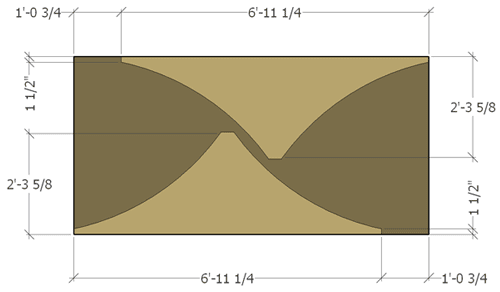
DRAWING THE TRANSITION
There's a few different ways to do this, I'm going to explain it the way I do it. Grab an 8" long 2x4. On one end, drill a hole the diameter of a pencil (about 3/8").
Then measure from the hole you just drilled, out the distance of the transition radius. In this case, 5'-6. Place a screw there but don't go all the way through the 2x4 yet.

Take your 3/4" plywood and lay it on a fairly level surface. Grab another sheet of plywood, your 3/8" sheet should do, you might have to place some scrap wood under it to bring it up to the level of the 3/4".
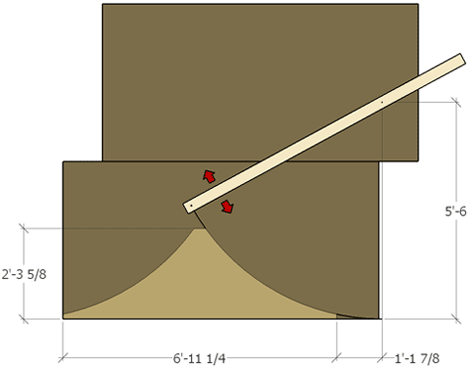
Place it next to the 3/4" plywood, long end to long end, touching. It will have to hang over a bit for it to work as seen below.
With the 2x4 you made earlier, screw the screw into the 3/8" plywood where shown above. Now you want to draw a radius using the 2x4 to guide your pencil until you have the transition radius clearly visible on the 3/4" sheet of plywood.
Once done, move the 3/8" sheet over and draw the other side the same way as before using the dimensions provided above.
CUT THE TRANSITION
Carefully cut the transition using the lines you just drew. Once cut, you can use this transition as your template to trace onto the plywood and cut out the other side of the ramp
FRAMING THE BOTTOM
Your done with the hardest part, now it's time to frame the spine ramp. Start by attaching the bottom, middle and top 2x4's as shown.
FRAMING THE CENTER
Take the remaining 2x4's and frame the riding surface portion by placing the 2x4's 8" on center except where noted.
BUYING THE COPING
To find the steel, look up "steel yards", "structural steel" or "steel fabricators" and so on in the phone book.
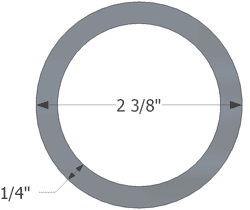
The actual size of the pipe you are looking for will be 2 3/8" outside diameter with a 1/4" wall thickness. This pipe is known by steel shops as...
2" OD, Schedule 80, black steel pipe.
Some steel shops are picky about what it's called so use the above name if they seem confused.
DRILLING THE COPING
As mentioned in previous plans, there are more than a few ways to attach the coping to the quarter pipe. In my opinion, screws work the best.
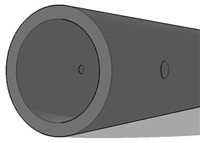
Start by drilling a 3/8" hole on the outside of the steel coping. Then drill a 3/16" hole on the inside of the coping making sure both holes line up. On a ramp this size, you'll want to put three screws per piece of coping, one in the middle and one on each end a couple inches from the edge.
ATTACH THE COPING
Once drilled, attach each piece of coping to the top of the micro spine as shown by feeding a screw through the outside 3/8" hole, then the inner 3/16" hole. This can be tricky but with a little patience you'll get it.
With a drill or screwdriver, screw it down and move on to the next pre drilled hole. You should have a screw on each end and one in the middle.
By the way, don't worry about the holes interfering with your skating. You'll never feel them, guaranteed (unless they are larger than 3/8").

COVERING THE RAMP
Take a sheet of 3/8" plywood and cut it in half, making two equal pieces at 4'-0 by 4'-0. Place one on each side of the ramp with the grain going from side to side, allowing the wood to bend more easily.
Starting from the top of the ramp, put screws about a foot apart into the plywood and 2x4s.
Now cut two pieces 11" wide by 4'-0 long out of the next sheet of 3/8" plywood. Place these at the bottom of the ramp, finishing up the first layer.
Using that same sheet of plywood, cut two pieces at 1'-1 3/4 wide by 4'-0 long and attach them to the ramp, starting at the top and placing the screws about a foot apart working your way down the ramp.
Take your last sheet of 3/8" and cut it in half so you have two 4'-0 by 4'-0 pieces. Use these to finish off the second layer of the ramp, starting where the 1'-1 3/4 pieces ended.
Make sure you screw into the 2x4's. On a ramp this size you can lay a 2x4 across and mark where the studs are located or use a chalk line.
ATTACHING THE MASONITE
With both layers of the 3/8" ply fully screwed down, cut the masonite in half, making two equal pieces at 4'-0 by 4'-0.
Starting at the top, attach it the same way you did the last two layers. Only this time you will want to countersink your screws a little bit using a countersink bit or a 3/8" drill bit. This allows the surface to be as smooth as possible and keeps your body from being ripped to shreds during a fall.
ATTACHING THE THRESHOLD
Last on the list is to attach the 3/16" thick, 4'-0 by 1'-3 1/2 piece of steel threshold. You can also use 1/4" plastic or even 1/4" plywood if you can't find any steel. Though the 1/4" plywood will begin to chip and/or break quite soon.
As with all steel that you attach to a ramp, drill a 3/16" hole and countersink to allow the screw head to be flush with the ramp. You will need 3 screws in this threshold, 1 on each end and 1 in the middle.
The steel threshold is also availabe at steel fabrication shops. You may be able to find the steel at home improvement stores too. They don't have the best selection, but it might be enough to get you by.
SKATE IT
There you have it, another installment to the "Micro Ramp" family. This skateboard ramp is great for learning transfer tricks, which you can then take to bigger ramps. Good luck, and have fun!