INTRODUCTION TO RAMP FOUNDATION
If you haven't noticed, there are tons of ways to build things in the world of construction.
There are usually ways that set themselves apart from the rest as being the better way. Ramp foundations are no different.
Below I will explain the way that I feel is the better way. For more information on foundations, visit one of the many deck websites on the web.
Or you could just throw some extra lumber on the ground and try to level your structure that way, but I highly suggest going th
PICKING THE LOCATION
I struggled with whether or not to include a brief entry on safety in this skateboard ramp building tips article and ended up thinking that it would be a good idea. However, I'm not your mom and I have no place to tell you to wear safety glasses or to be extra careful when working with power tools. Especially since I refuse to wear a helmet.
Though there is a difference between having confidence in your ability and taunting the laws of physics. Use common sense when you're building and you'll be a happier person for it.
LEVEL THE LOCATION
Once you've picked your location, take your ramps width and length and measure it out onto the land. About a foot wider than your ramp, in each corner, drive a wooden stake into the ground. Leaving at least a foot of stake above ground (more if you're building on a very unlevel surface).
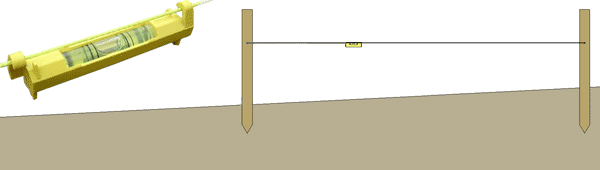
Locate the stake in the highest point of land and about 8" up on the stake, attach a string to it. Now attach the string to the opposite corner. Place a line level in the middle of the string and move the string up or down until it reads level. It helps to have another person here. Do this for all four corners.
LAYOUT
Now mark the ground with a spray paint "X" where the corners of the ramp will be inside the string perimeter. Divide the width into 4' sections and mark that as well.
Lengthwise layout is a little more complicated as it depends on the ramp you are building.
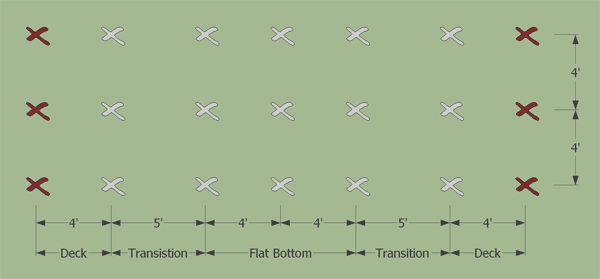
For instance, a 3' tall mini ramp that has a 4' wide deck, approximately 5' long transition templates, and a 8' long flat bottom would have you lay out the foundation locations as shown below.
The red "X's" indicate where to dig for the footings, while the white "X's" locate the cinder blocks.
Remember, this is a generic layout and will vary depending on which mini you are building.
INTRODUCTION TO FOOTINGS
Next we have the footing, where the post meets the ground. Footings give your structure a base to level from, keep it from settling and help distribute the weight.
The three most common footings are...
A post in concrete, post on a concrete pier and a post on pre-cast concrete block as shown below.
While the first method of a post in concrete is the most straight forward, it is also fairly permanent. The post on a concrete pier shares the same drawback and tends to be costly. The last method described here, a post on a pre-cast concrete block, can be expensive as well. Although you can remove the footings easily if needed and there is much less digging. In some cases, no digging is necessary at all.
In my opinion, the last method of a post on a pre-cast block is the way to go. You can even pour your own pre-cast blocks, which saves a good deal of cash... more on that in another article at another time.

PLACING THE PERIMETER FOOTINGS
Using the pre-cast concrete block method, dig a 16" round hole, 8" to a foot deep and tamp or compact the soil. Fill the hole about 4" to 6" with gravel and place a footing block (square concrete paver) on top of the gravel. Use a torpedo level to make sure the block sits flat. Now place the pre-cast block on the concrete pad, back filling dirt around the footing.
This only needs to be done at the ends of the structure, under the deck. Although you can place these underneath the entire structure, it would just be a lot of work and pretty expensive.
Following this method will give you a solid, level foundation to build from and is highly suggested.
FOUNDATION AS A DECK SUPPORT
Now that you've got the footing sorted, you'll need to choose which post support method works best.
One option would be a 4x4 post on the concrete block and level it to your string. Then notch the post to allow a 2x4 to be bolted to it, as seen below. Then place the deck on the footing
and post.

If you choose to notch the post, you can cut out the notch with a reciprocating saw, circular saw and chisel or a hand saw. You will want to attach the 4x4 to the 2x4 with two - 1/2" carriage bolts as shown
FOUNDATION AS PART OF THE DECK
Or... you can run the post up and bolt it to the deck as shown below. This method is recommended and necessary for ramps taller than 4' in height.
You will have to construct the deck like I have it drawn in the above image as some of the mini ramp plans here on this site show the deck being made for a level surface, such as a driveway.
FINISHING THE FOUNDATION
Now, finish off the foundation by placing footings and cinder blocks in your previously marked locations.
You'll want to level and compact the soil first, then use a paver block for it's footing. Place a cinder block on the footing to bring it up to the desired height.
Once your foundation is level and solid, you're ready to build.
This is just one of the many ways to level a structure, although it's served me well for years and is my suggested method. But feel free to consult other sites and find what works best for you and your budget.