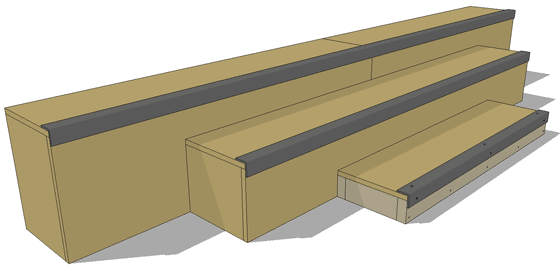
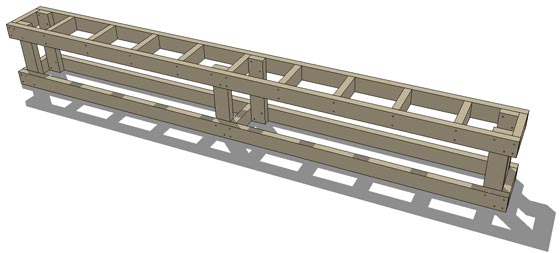
HOW TO MAKE A STAIR LEDGE
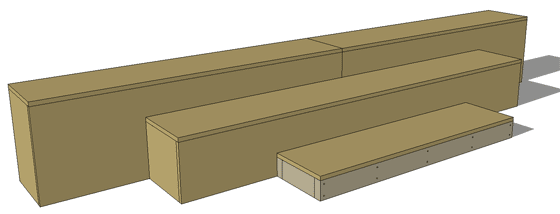
This ledge is 10' long, 3' wide and a 1'-5 tall (at it's largest).
It is also going to be quite heavy once built. I suggest that you build it in a location where it can be left permanently. Unless you are prepared to disassemble it each time you want to move it.
WHERE TO GET SUPPLIES
The wood and hardware can be found at most home improvement stores. Sometimes you can find the steel there as well, I know my local Home Depot carries the coping and threshold material.
If not, you can search the internet for steel fabricators or salvage steel. Personally, I've begun buying my steel from MetalsDepot.com because of their very quick shipping and good prices. I'm not affiliated with them in any way, I just like them and their product.
If this ramp is going to stay outside, it needs to be protected from the elements. A good place to start is with pressure treated lumber, paint and a tarp. You may want to invest in a composite material for the surface too. Such as Skate Lite or Ramp Armor.
Be extra careful when working with treated lumber though, the chemicals used to treat the wood contain a poisonous pesticide.
BUILD IT
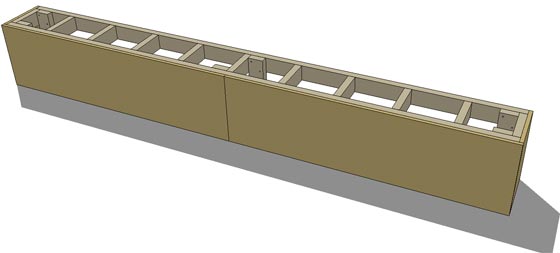
This ledge is really just three ledges of different sizes placed back to back. If you plan on moving this ledge often, it would be a good idea to keep them separate. More on that later.
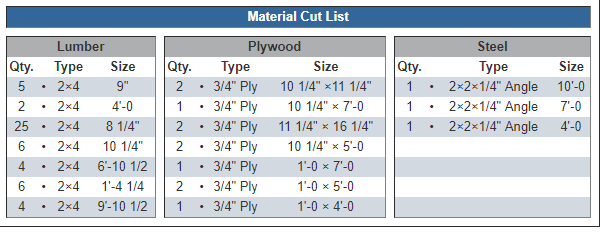
Gather your materials. Start with the 2x4's. Using the cut list below, cut all your 2x4's and set them aside. It's a good idea to keep the 2x4's separate and mark them so you don't mix them up.
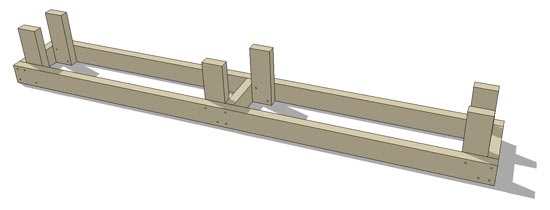
FRAMING THE BOTTOM
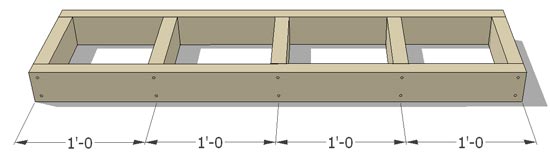
Build the small ledge to look like the picture below. Use the two 2x4's at 4'-0 for the sides and five of the 9" pieces for the framing.
If you plan to attach the ledges together using bolts, don't put any plywood on this ledge or the other two until they have been bolted together.
It's a good idea to pre-drill the screw locations near the ends with a 3/16" drill bit to keep the wood from splitting, keep that in mind throughout the build.
FRAMING THE BOTTOM - MEDIUM LEDGE
Now start framing the medium sized ledge. Use two 2x4's at 6'-10 1/2 for the sides and three of the 8 1/4" pieces for the framing. The one in the middle is centered.

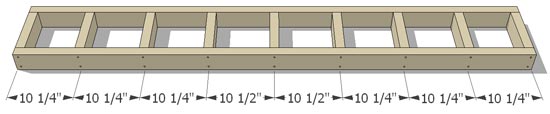
FRAMING THE BOTTOM - MEDIUM LEDGE
Frame the top as shown above. Use two of the 6'-10 1/2 long 2x4's for the sides and nine of the 8 1/4" pieces placed every 10 1/4" on center except where noted.
ATTACH THE SIDES - MEDIUM LEDGE
Attach the 6 pieces that are 10 1/4" in length to the bottom of the box like shown here. Put four screws in each piece, 2 through each side or cross member.
ATTACH THE TOP - MEDIUM LEDGE
Place the top on the newly attached sides. This is much easier if you flip the bottom over or lay it on its side. Put 4 screws in each just like the bottom. Make sure the box is level and square. If you don't the box will rock on the ground because one side will be higher than the other.
ATTACH THE PLYWOOD - MEDIUM LEDGE
Once the medium ledge is framed you can attach all the plywood except the top as shown in the picture. The sides are 11 1/4" wide by 10 1/4" tall. The front is 7'-0 long by 10 1/4" tall.
FRAMING THE BOTTOM - LARGE LEDGE
Finally, build the large ledge starting with the bottom. Use two 2x4's at 9'-10 1/2 for the sides and three of the 8 1/4" pieces for the framing. The one in the middle is centered.

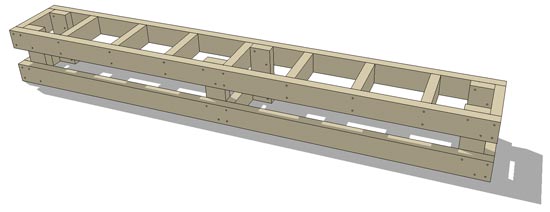
FRAMING THE TOP - LARGE LEDGE
Frame the top as shown above. Use the last two 9'-10 1/2 long 2x4's for the sides and eleven of the 8 1/4" pieces placed every 1'-0 on center except on the ends where it's 11 1/4".

ATTACHING THE SIDE - LARGE LEDGE
Attach the 6 pieces that are 1'-4 1/4" in length to the bottom of the box like shown here. Put four screws in each piece, 2 through each side or cross member.
ATTACHING THE TOP - LARGE LEDGE
Place the top on the sides you just put on. Just like the previous ledge, this is much easier if you flip the bottom over or lay it on its side. Put 4 screws in each just like the bottom. Make sure the box is level and square.
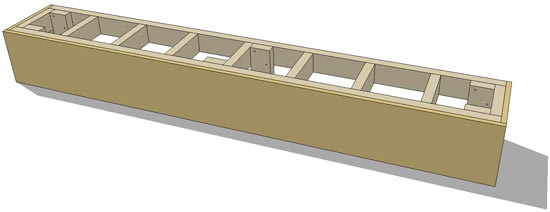
ATTACHING THE PLYWOOD - LARGE LEDGE
Once the large ledge is framed you can attach all the plywood except the top as shown in the picture. The sides are 11 1/4" wide by 16 1/4" tall. The front is made up of two pieces 5'-0 long by 10 1/4" tall.
ASSEMBLING THE LEDGES
Now that the framing is done, center the medium sized ledge behind the small ledge and drill two 9/16" holes about 6" in from the sides of the smaller ledge.
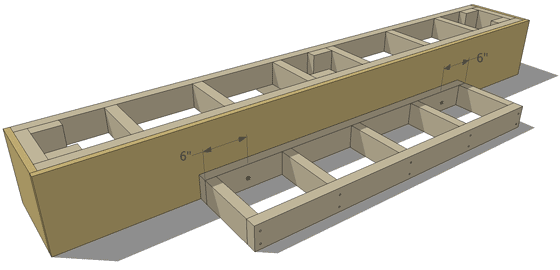
You will want to go through both the medium ledges 2x4 and plywood and the smaller ledges 2x4. That's 3 3/4" of wood to drill through so make sure your drill is strong and your drill bit is sharp.
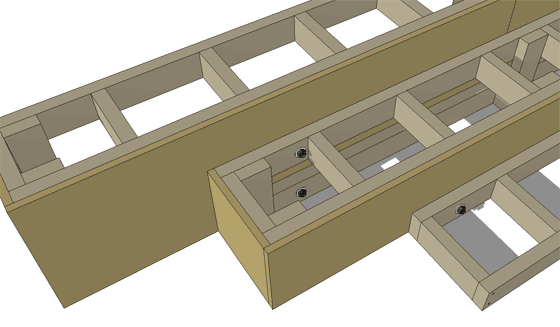
Once the holes are drilled, bolt the ledges together using two, 1/2" x 5" bolts, nuts and washers.

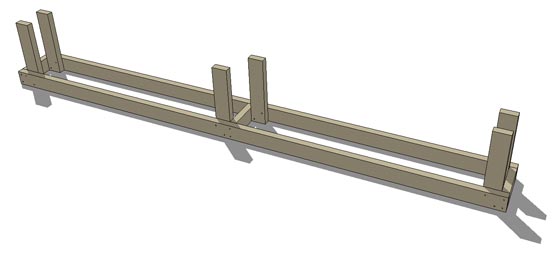
ASSEMBLING THE LEDGES - CONTINUED
With the first two ledges attached to each other, center the final ledge behind the assembly and bolt it together in the same way, using four bolts instead of two as shown below.
Once assembled, cover each ledge with plywood. 4'-0 x 1'-0 for the small ledge, 7'-0 x 1'-0 for the medium ledge and two pieces at 5'-0 x 1'-0 for the large ledge.
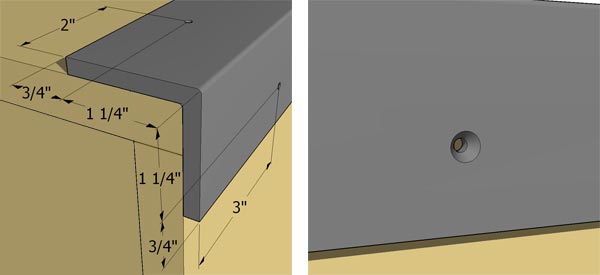
ATTACHING THE COPING
Place the angle iron on the edge. Drill a 3/16" hole on each end on both sides where shown. The top and bottom dimensions are offset so the screws won't hit each other. For the small ledge use 6 screws total, two on each end and two in the middle. 8 for the middle ledge and 10 for the final ledge.
After the holes are drilled, countersink each by using the 3/8" drill bit to drill down just enough so the screw heads are flush with the coping. This will keep your trucks and board from hitting them when you grind or slide.
SKATE IT
Whew, if you have made it this far, congratulations. The trick possibilities on this beast are endless and well worth the time and effort it took to build it. Good luck and have fun!