HOW TO MAKE A WALL RIDE
I thought to myself, hey that's a pretty good idea... and I don't have one on the site now, so let's see what I can do.
This is dedicated to Andy who passed away August 10th 2009.
As with all structures here on DIYskate, you can build this wall ride any size you want. But for the material list to be accurate you will need to follow the plans as listed below.
WHERE TO GET SUPPLIES
The wood and hardware can be found at most home improvement stores. Sometimes you can find the steel there as well, I know my local Home Depot carries the coping and threshold material.
If not, you can search the internet for steel fabricators or salvage steel. Personally, I've begun buying my steel from MetalsDepot.com because of their very quick shipping and good prices. I'm not affiliated with them in any way, I just like them and their product.
If this ramp is going to stay outside, it needs to be protected from the elements. A good place to start is with pressure treated lumber, paint and a tarp. You may want to invest in a composite material for the surface too. Such as Skate Lite or Ramp Armor.
Be extra careful when working with treated lumber though, the chemicals used to treat the wood contain a poisonous pesticide.
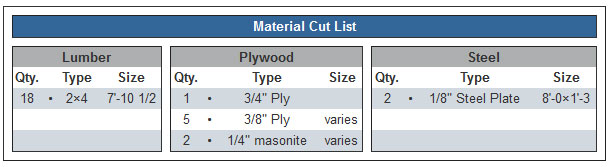
Materials needed
- 5 - 4x8, 3/8" plywood
- 1 - 4x8, 3/4" plywood
- 2 - 4x8, 1/4" masonite
- 18 - 2x4's, 8' long
- 1 - 5lb box of 1 5/8" screws
- 1 - 1lb box of 2 1/2" screws
- 2 - 8'x1'-3x1/8" steel plate
Tools needed
- Tape Measure & Pencil
- Circular & jig saw
- Drill w/ philips bit
- Assorted drill bits
- Chalkline
- Clamps
Approximate Cost: $200
Easy | | | | | Difficult
BUILD IT
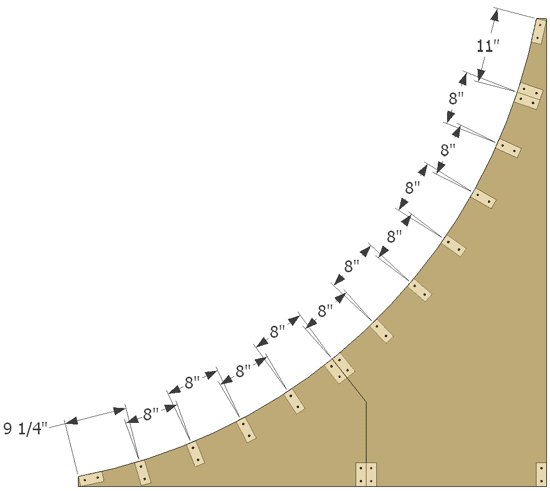
Gather all your materials. Start with the 2x4's. Cut 7 pieces at 7'-10 1/2 in length. Set them aside. Below is a cut list referencing what else you will need and it's size.
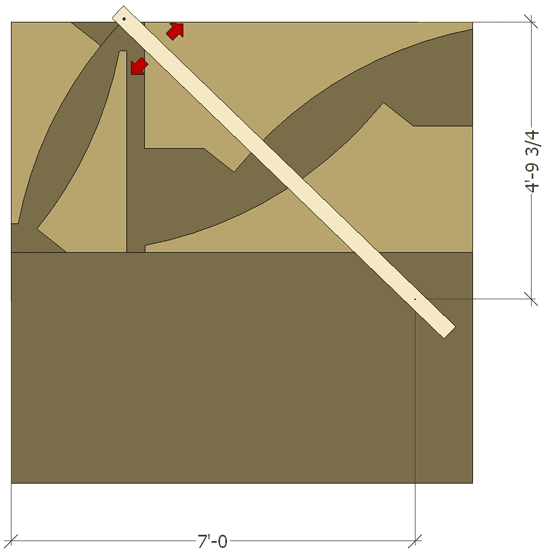
PLYWOOD LAYOUT
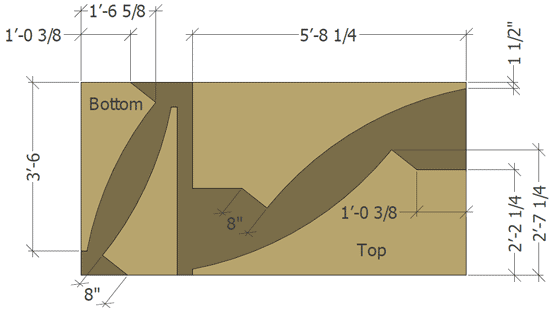
The plywood layout diagram shows you where to cut the sides and their measurements.
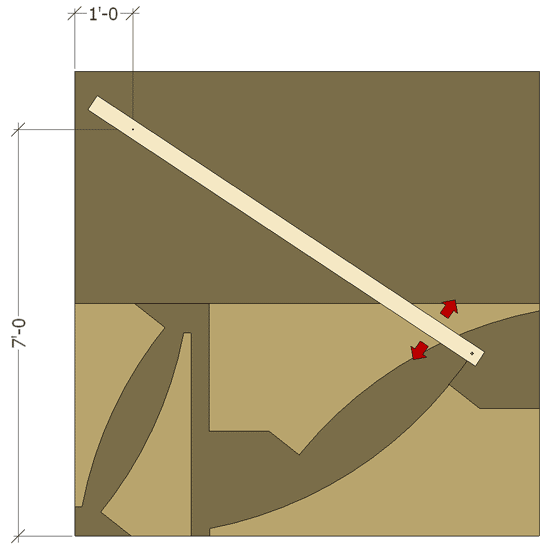
MAKING THE 2X4 COMPASS
Using an 2x4 that is 5'-0 or longer, drill a hole that's the diameter of a pencil about 2" in from the end.

Then measure from the hole you just drilled, out the distance of the transition radius. In this case, 4'-0. Place a screw there but don't go all the way through the 2x4 yet.
MARKING THE PLYWOOD
By placing a piece of your 3/8" plywood above your 3/4" sheet, you can use the 2x4 compass by attaching the screw to the plywood where shown below. Guide your pencil with the 2x4 compass to clearly draw the transition radius on the 3/4" ply.
After you've drawn the transition for the top piece, move the 3/8" ply below the 3/4" sheet and place the 2x4 compass where shown, drawing the transition for the bottom portion of the ramp.
Since you'll need two of each transition pieces, you can use the one's that you've drawn to trace onto the other. But first you'll need to make the notch cuts so the top and bottom pieces fit together properly.
LOCATING THE NOTCH
To locate the notch for the bottom piece, measure out 1'-0 3/8 and mark the plywood. Now measure out 1'-6 5/8. With a straight edge, draw a line from each point for the angled notch (which should be 8").
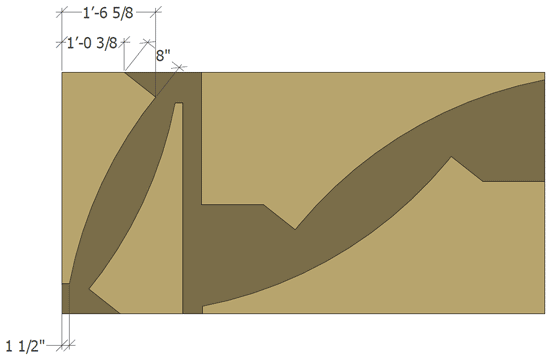
For the top piece, you'll need to measure up 2'-2 1/4 and mark the plywood. Now measure up 2'-7 1/4. Finally, measure out 1'-0 3/8 and mark this as well as shown below. With a straight edge, draw a line from the final two points to create the angled notch (which should be 8").
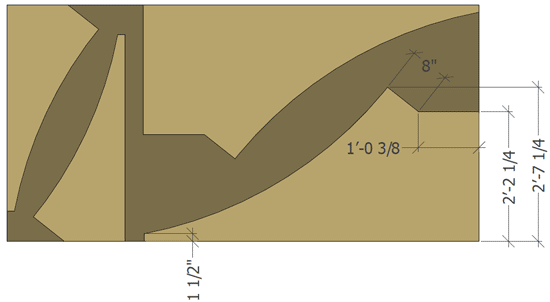
I hope this wasn't too confusing. But it's necessary to cut the pieces like this so you can get both sides out of one 3/4" piece of ply. That and because the ramp is taller than 4'-0.
CUT THE TRANSITION
Carefully cut the transitions you have laid out using the lines you just drew. Once cut, you can use these transition as your template to trace onto the plywood and cut out the other sides.
FRAMING THE BOTTOM
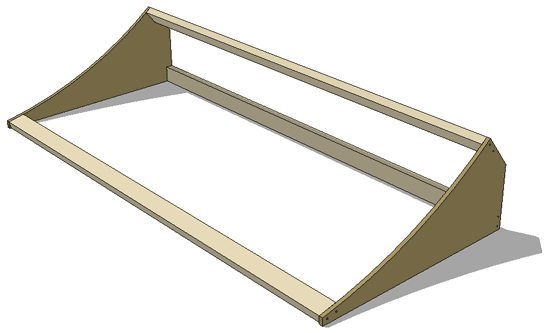
Frame the bottom using three of the 7'-10 1/2 long 2x4's for the front, back and top as shown above.
FRAMING THE TOP
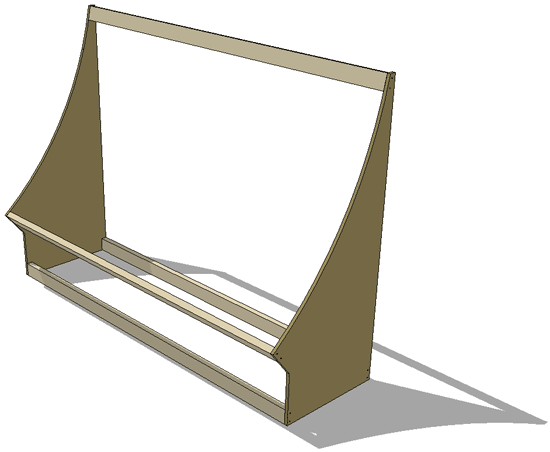
Frame the top using four of the 7'-10 1/2 long 2x4's for the front, back and top as shown above.
ASSEMBLING THE SECTIONS
Clamp the bottom section to the top section and screw them together using plenty of 2 1/2" screws.
Any clamps will do, I just like to use Quick Clamps.
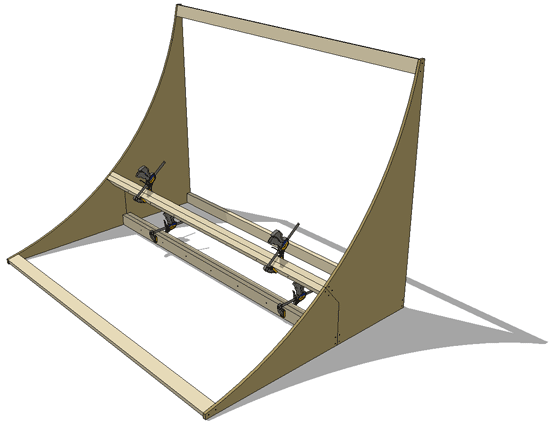
FRAMING THE SIDES
Attach the remaining eleven 2x4's spacing them 8" apart, on center except where noted.
You will want to double up the 2x4's as shown. This is where the 3/8" plywood seam will meet and the double 2x4's allow a larger surface area for attaching the two sheets.
COVERING THE RAMP
Starting where the first set of double 2x4's are, attach the 3/8" ply and work your way down the ramp. Then place another full sheet next to the first and finish off the first layer with a piece that's 1'-6 by 8'-0.
ATTACHING THE SECOND LAYER
Attach a piece of 3/8" that is 2'-0 by 8'-0 and place it at the bottom of the ramp, overlapping the bottom layer by about 1 3/4". Then a full sheet and finally a piece that's 3'-9 1/4, it too should overlap the layer underneath it by 1 3/4".
ATTACHING THE MASONITE
It's best to cover this ramp with masonite and a steel threshold. Place a full sheet of masonite 1'-1 1/4 up from the start of the second layer then a sheet that's cut to 3'-5 3/4".
Now take two pieces of 1/8" steel at 8'-0 by 1'-3 and attach them to the ramp flush against the masonite.
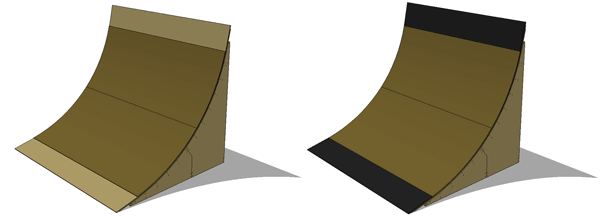
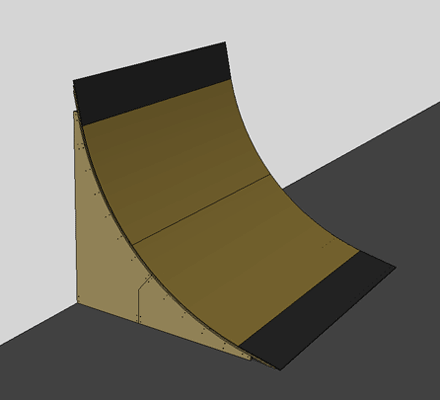
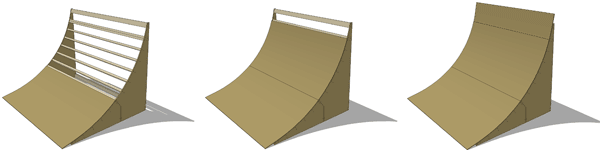
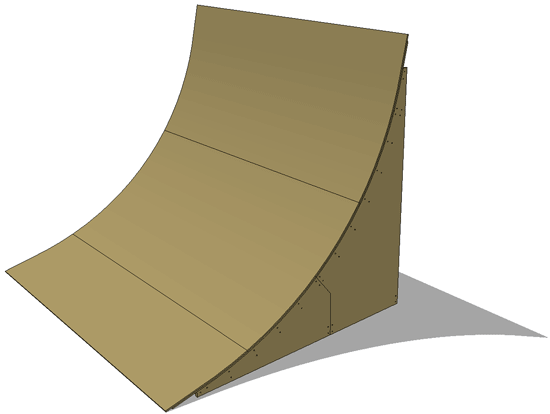
FINISHED
Find a smooth wall behind an abandoned warehouse and see how high you can get. This wall ride isn't going to be the lightest ramp around, so you might want to scope out a good spot before you start.