HOW TO MAKE A WOOD SKATEBOARD MOLD
Wood skateboard molds are nice because they can be used to make a skateboard deck using all sorts of pressing techniques and they're not too expensive to make.
The wood skateboard mold in this article works best with pipe clamps and aside from the tools, it should cost less than $30.
I made this wood skateboard mold with these plans in mind and by following this article it shouldn't be that difficult for you to make, very time consuming, but not that difficult. Just make sure you have a thorough understanding of how it is done before starting this project.
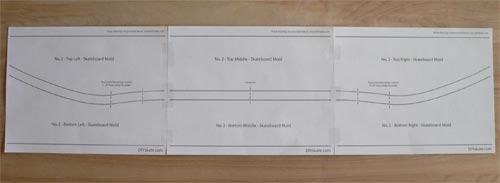
To make this skateboard mold accessible to the novice wood worker while retaining as much accuracy as possible, you will need to print out the three PDF section drawings below. These section drawings have been drawn to scale, meaning that once printed, they will be the same size as the wood mold that you're making. Also, each PDF section drawing represents both the top and bottom of of the wood skateboard mold.
The line on the top and bottom of the section drawings corresponds to the top and bottom of the 2x8 whose overall height is 7 1/4". The lines in the center are the cut lines, lines that once cut will make up the top and bottom of the wood skateboard mold.
| PDF Sections | Section Zero | Section One | Section Two | Section Three |
CHECKING SCALE
To make sure these PDF section drawings are printed to scale, they should fill up a standard 8 1/2" x 11" sheet of paper in it's entirety minus a 1/4" or so on either end of the sheet of paper depending on your printer.
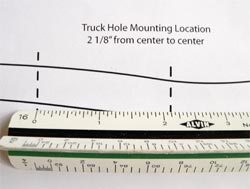
You can also check the scale by measuring the distance between the truck mounting lines, this measurement should be 2 1/8". The wheel base dimensions will measure out to be 14 1/4" and the top and bottom lines on the drawings will be 7 1/4", which is the actual height of a 2x8.
The width of a 2x8 or thickness is 1 1/2".
Optional: If you want a shorter wheel base for your wood skateboard mold, make the 14 1/4" distance shorter.
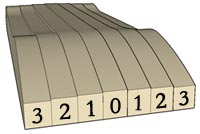
Also, to save space and time, PDF section drawings 1 through 3 will be printed twice and used for both sides of the wood skateboard mold not the top and bottom. You will use the PDF section drawing 0 once, for the center 2x8 as seen to the right.
BUILD IT
Gather all your materials. Start by cutting two 12' long 2x8's into 34" lengths. You will need a total of seven. Piece your printed PDF section drawings together, end to end, as shown here.
They are only going to add up to 33", so your going to have to draw that extra half inch on each end.
CUTTING TO SIZE
Using spray adhesive, glue and center the section drawings onto the 2x8. The wood will have 1/2" exposed on each end. By gluing the patterns on, you can just follow the lines with a jigsaw and peel off the drawings when you're done. Or you can trace the drawings if you choose.
SHAPING
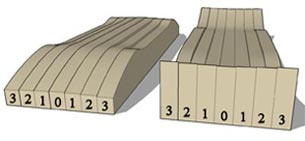
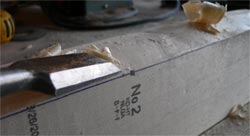
Now place the cut 2x8's on a flat surface. They should resemble stairs. Trace their outline onto the piece next to it.
You can remove the excess wood by chiseling down at an angle to 1/16" or so of this newly drawn line.
You can also use a heavy grit sandpaper wheel on an angle grinder. 40 or 60 grit should do the trick.
It will remove the excess wood quickly, almost too quickly so be careful not to take off too much.
Do this one piece at a time and try not to remove any wood from the sawn edge.
CLARIFICATION
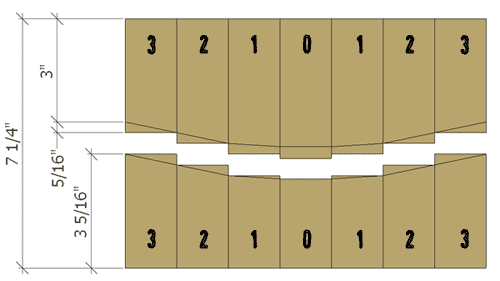
It has come to my attention that the PDF's and this article do not explain exactly where you need to remove the excess wood to create the concave and convex of the wood skateboard mold.
So I threw together the above image to more accurately show where you should chisel to. It is a cross section of the mold, in the middle.
The curved line represents the cut line. The #3 piece on the top should have about 5/16" of an inch removed as well as the center #0 piece, which was a bit too long.
As I have mentioned to others, the provided PDF's are more of a starting point. You will need to work at getting the two halves to meet by making the bottom to your satisfaction and checking often that the top fits during wood removal.
ASSEMBLE
Once they look similar to a finished skateboard mold, brush them off and set them aside..
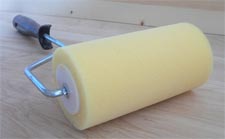
Using a 4" wide foam roller with paint tray and wood glue like Titebond, begin putting the shaped 2x8's together by rolling glue onto both pieces, starting with piece number 3. Attach it to piece number 2 with clamps. Now, while the clamps are in place, screw them together using about 3 screws. The screws will be left in for extra strength.
Unclamp and attach the glued assembly to piece number 1 using glue, clamps and screws. Repeat until done. After you've done both halves, allow the glue to dry overnight to prepare for finishing.
FINISH
Now that the glue is dry, sand the inside edges smooth to finish the skateboard mold. Again, make sure you don't remove too much wood. You just want to have each 2x8 meet the previous one.
An orbital sander with 60 to 80 grit sandpaper works good here. When all the edges meet, use progressively finer sandpaper until smooth.
When using this mold to press a deck, it's a good idea to use a thin layer of cork, about 1/8" thick on both sides of the veneer plies to make up for any imperfections in your mold.
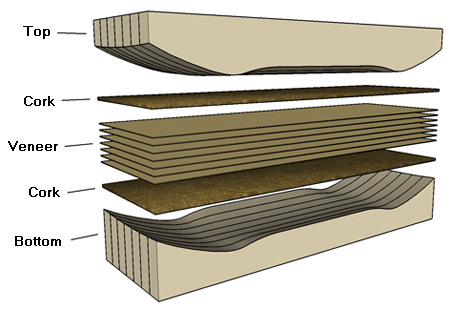
You can use about 10 pipe clamps (5 on each side) to press decks with this mold. They should provide enough pressure if left for about 24 hours to dry.
One last thing, this wood skateboard mold is only as accurate as you make it. Take your time, have patience and a good understanding of the process.
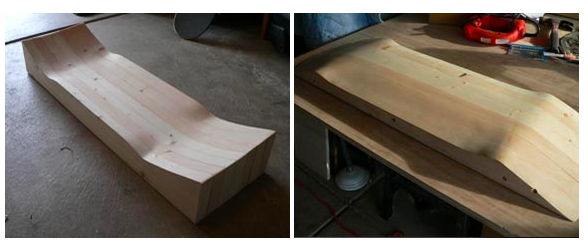
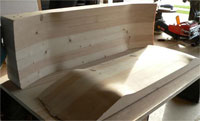
Your mold will not look exactly like these photos. I made that mold with 2x6's before realizing that 2x8's would work better for a wood skateboard mold. As you can see by how thin the top is.