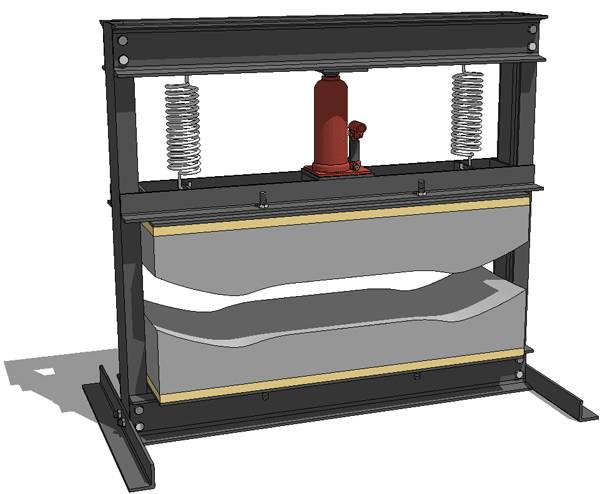
HOW TO BUILD A PRESS
Building a bottle jack press will allow you to apply tons of pressure (literally) to a skateboard mold. Which you will need to press the maple veneer in the concrete skateboard mold.
This DIY Press is not very hard to build but will require a welder and the ability to cut and drill some pretty substantial steel.
That said, this is one of those rare occasions where it may be cheaper to purchase a pre-made press from an industrial supply store such as Harbor Freight and alter to fit a skateboard mold.
For those who still want to build one themselves, keep reading.
PREPARE THE PRESS
Gather all your tools and materials. Bottle jacks can be found at hardware stores, industrial stores and online. You will need one that can provide a minimum of 5 tons of pressure.
For the steel, look up steel fabricators or salvage steel on the internet. Personally, I've begun buying my steel from MetalsDepot.com because of their very quick shipping and good prices. I'm not affiliated with them in any way, I just like them and their product.
There are many ways to build a bottle jack press, if you feel like using a different type of steel, bottle jack, etc... be my guest.
CUTTING THE MATERIAL
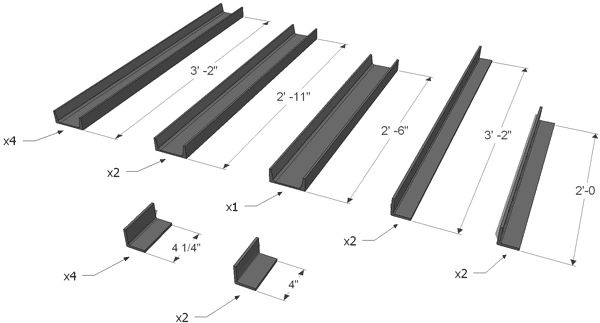
Starting with the C4x5.4 channel. Cut four pieces at 3'-2. Two pieces at 2'-11 and one last piece at 2'-6 in length. Now the 2x2x1/4" angle iron. Cut two pieces at 3'-2. Two pieces at 2'-0, four at 4 1/4" and finally two at 4" as shown below.
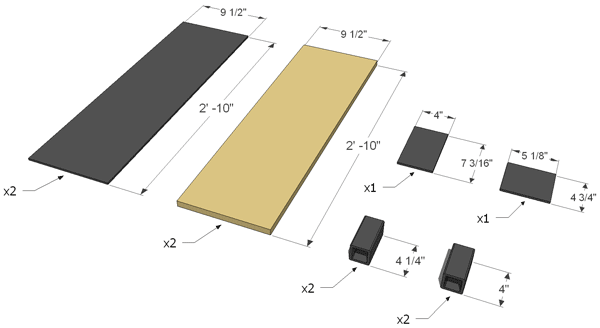
On to the 2x2x1/4" square tube. Cut two pieces at 4 1/4" and two at 4" in length. Now the 1/4" steel plate. Cut two pieces at 2'-10 x 9 1/2", one at 7 3/16" x 4" and finally one at 5 1/8" x 4 3/4". Last, cut two pieces of 3/4" thick plywood at 2'-10 x 9 1/2" as shown below. The dimensions provided are only suggestions as most bottle jacks vary in size. Once you've obtained your bottle jack you can make the appropriate changes.
DRILLING THE STEEL
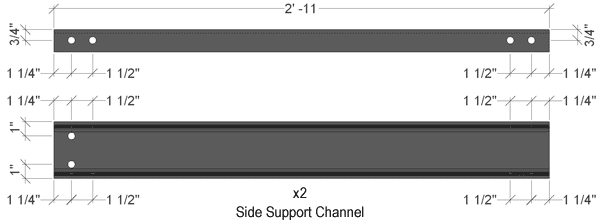
Using a 9/16" drill bit, drill ten holes per each 2'-11 channel in the designated location, as shown below. These are the side supports for the press and there are two.
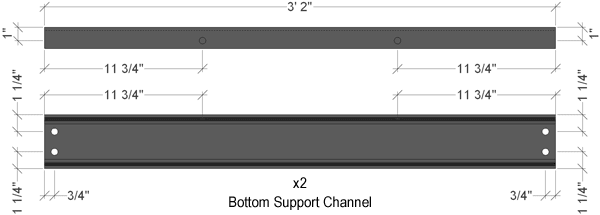
Now, using a 9/16" drill bit, drill six holes per each 3'-2 channel in the designated location, as shown below. These are the bottom supports for the press and there are two.

Last, using a 9/16" drill bit, drill two holes per each 2'-0 angle iron in the designated location, as shown below. These are the base supports for the press and there are two.
ASSEMBLING THE BASE
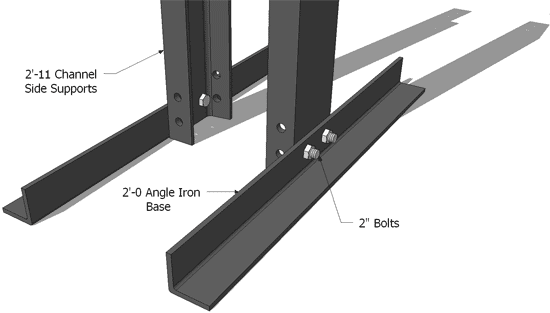
With the base cut and drilled, take the angle iron and attach them to the side supports with the 2" bolts, nuts and washers.
Attach the bottom supports to the side supports using the 6" bolts, nuts and washers as shown below.
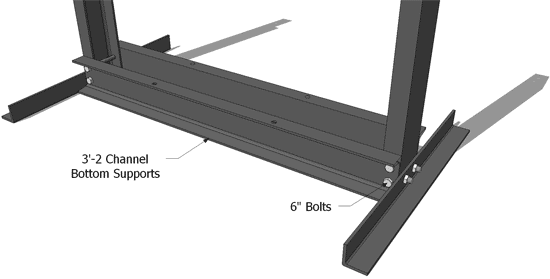
These 6" bolts go completely through the side supports on both sides. You could also use 1/2" threaded rod cut to length and the appropriate hardware instead of 6" bolts.
DRILLING THE BOTTOM PLATE AND PLYWOOD
The hole locations in the 1/4" plate and 3/4" plywood match the bolt locations for the bottom concrete skateboard mold. You should double check this dimension before drilling.
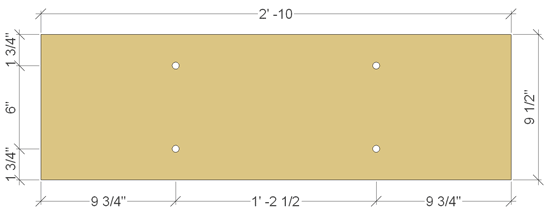
Take one of the 2'-10 x 9 1/2" x 1/4" steel plates and drill four 9/16" holes where shown below.
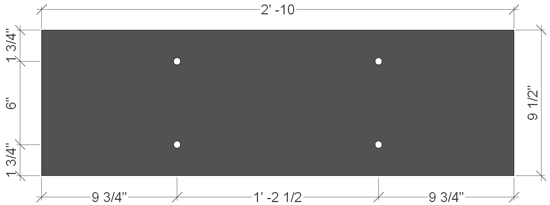
Take one of the 2'-10 x 9 1/2" x 3/4" plywood and drill four 9/16" holes where shown below.
These are the bottom plates, the hole locations differ from the top plates.
ATTACHING THE BOTTOM MOLD
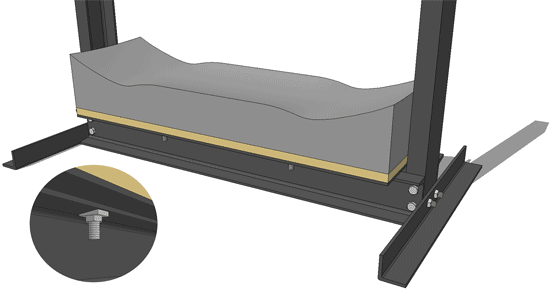
Place the 1/4" plate and 3/4" plywood on the base you previously assembled, lining up the 9/16" holes.
Now place the bottom concrete skateboard mold on the base, threading the bolts through the holes in the 3/4" plywood, 1/4" steel plate and bottom support channel. Using beveled washers, place a nut on each bolt and tighten as shown above.
DRILLING THE MOLD AND SPRING SUPPORT
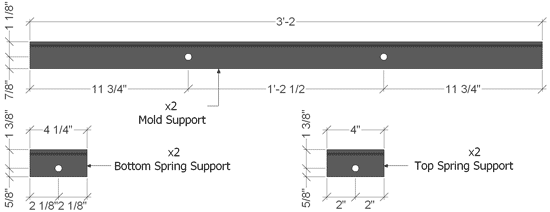
Gather the 1/4" x 1/4" x 3'-2 angle iron and drill two 9/16" holes where shown. These are the top mold supports and there are two.
Take the 1/4" x 1/4" x 4 1/4" angle iron and drill one 9/16" hole where shown. These are the bottom spring supports and there are two.
This is a good time to drill the 1/4" x 1/4" x 4" angle iron too. Drill one 9/16" hole where shown. These are the top spring supports and there are two, set these aside until later.
ASSEMBLING THE TOP MOLD SUPPORT
Position the two 3'-2 mold supports parallel to each other, 4 1/8" apart. Place two square tubes, two bottom spring supports and two undrilled 4 1/8" x 1/4" angle in between the mold supports as shown below. Tack weld these in place maintaining the correct spacing and dimensions. Once this is achieved, weld them together keeping the bottom side smooth. Set this assembly aside for now.
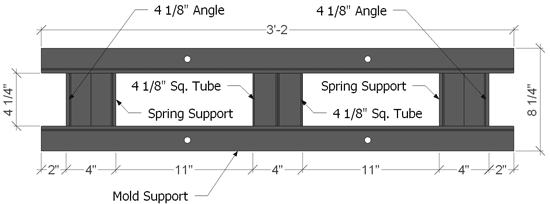
Once assembled, weld the 4 3/4" x 5 1/8" x 1/4" steel plate in place. This plate is the bottle jack mounting plate and is centered under the bottle jack, not the top support.
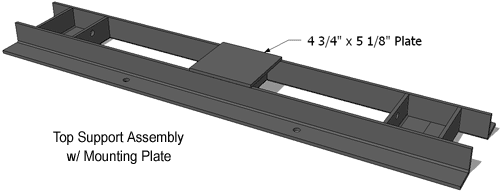
Due to the many different bottle jacks, the mounting plate size will vary.
DRILLING THE TOP PLATE AND PLYWOOD
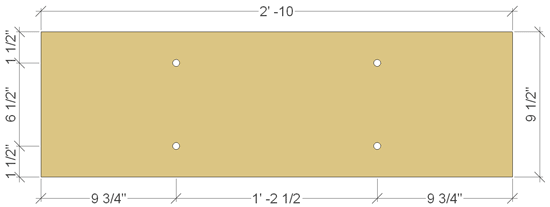
The hole locations in the 1/4" steel plate and 3/4" plywood match the bolt locations for the top concrete skateboard mold. You should double check this dimension before drilling.
Take the remaining 2'-10 x 9 1/2" x 1/4" steel plates and drill four 9/16" holes where shown below.
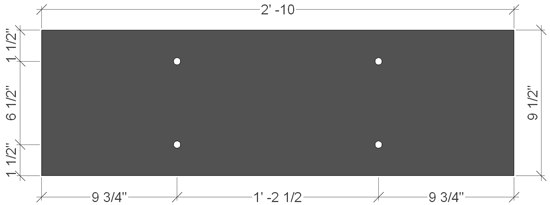
Take the remaining 2'-10 x 9 1/2" x 3/4" plywood and drill four 9/16" holes where shown below.
These are the top plates, the hole locations differ from the bottom plates.
ASSEMBLING THE TOP MOLD
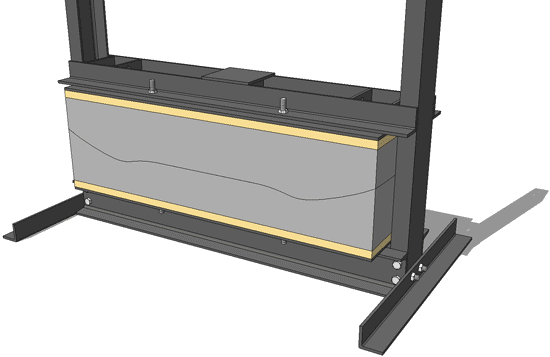
Place the top concrete skateboard mold on the bottom mold in the press. Thread the bolts through the holes in the 3/4" plywood, 1/4" steel plate and top support assembly, bolting it in place with nuts and washers as shown below.
There should be an 1/8" gap between the angle iron and either side of the channel side supports.
DRILLING THE STEEL
Using a 9/16" drill bit, drill four holes in each of the last 3'-2 channels in the designated location, as shown below. These are the top supports for the press and there are two.

ASSEMBLING THE TOP SUPPORT STRUCTURE
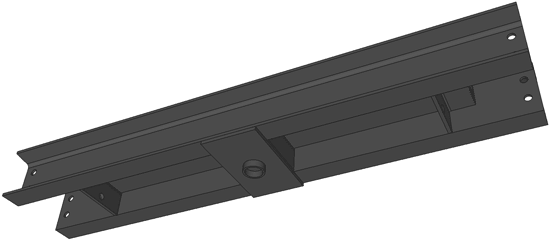
Position the last two 3'-2 top supports parallel to each other, 4" apart. Place two square tubes and two top spring supports in between the top support channel as shown below. Tack weld these in place maintaining the correct spacing and dimensions.

Flip this assembly and place the final 2'-6 channel, centered in between the top support channels as shown below. Tack weld the channel into place.
Once assembled, weld the 4" x 7 3/16" x 1/4" steel plate in place. This plate is the bottle jack top plate and is centered under the square tubing.

Once fully assembled, finish welding the structure. The small round tube in the illustration is centered and welded to the mounting plate also. It is there to keep the top of the bottle jack from moving around once in place.
ATTACHING THE TOP
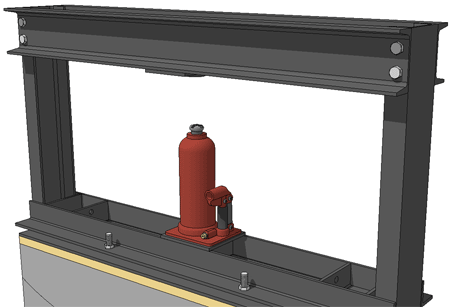
Take the previously assembled top structure and bolt it to the press using the 6" bolts, nuts and washers as shown.
Here's the fun part, center the bottle jack on the bottom mounting plate. Weld or bolt it into place, depending on your jack.
This set of plans was drawn with this 5 ton bottle jack in mind, model number 76505. This 5 ton bottle jack is 9" tall, and has an extension of 6 1/4". Again, you can use whatever bottle jack you want, i'm just letting you know which bottle jack the press was designed around.
Update:
I have been getting a lot of emails recently asking if the 5 ton press will apply enough pressure. For a press like this, which is more for making decks as a hobby, 5 tons is a large enough jack. You will need to leave the veneer in for a longer amount of time and it's best to only press one deck at a time, but it will work.
If you want to put a larger bottle jack in it's place, this press can take up to a 10 ton bottle jack before it's necessary to make the press stronger to withstand the extra pressure.
ATTACHING THE SPRINGS
Finally, raise the top concrete mold and place something like a block of wood between the molds so you can attach the springs. Take each spring and attach it to each of the angle iron pieces, through the previously drilled holes. Making sure they are attached very well.
The springs hold up the weight of the bottle jack, plywood, steel plates, angles and concrete. So choose the springs wisely. You should be able to get them at an industrial supply store or even a scrap yard.
Other than some paint to protect the press from rust, you're done. Time to start making some decks!
Before knocking out hundreds of decks a day, you should run the press through the motions carefully to make sure all is well and work out the kinks, good luck!
