HOW TO MAKE A CONCRETE SKATEBOARD MOLD II
A while back a guy named Rocky sent me a few pictures of his skateboard mold and press. Both the mold and press were about as well made as possible and can be seen here.
After looking closely at the pictures of the skateboard mold, I quickly realized that his concrete mold design was quite a bit better than my concrete mold design
My design still works fine, but it adds unnecessary steps. So I decided to write this article, explaining how to make a concrete skateboard mold like the one that Rocky made.
The only thing different from the original concrete mold design is the way you make the wooden box that forms the concrete mold.
Due to how quickly hydraulic cement sets up, I suggest using regular curing cement. You won't be rushed and the product may turn out better because of this.
BUILD IT
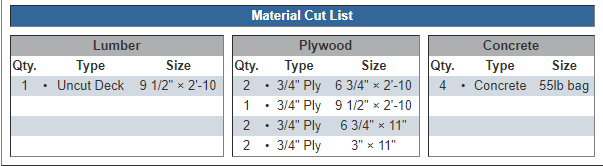
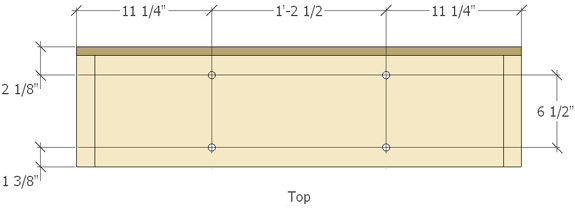
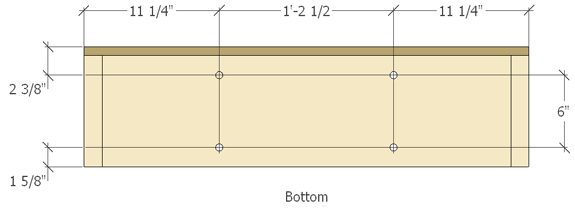
Gather all your materials. Start with the 2x10's. Cut them into four pieces. Two at 1'-0 in length and two at 2'-10 in length. Set them aside. Below is a cut list referencing what else you will need and it's size.
CUT THE SIDES
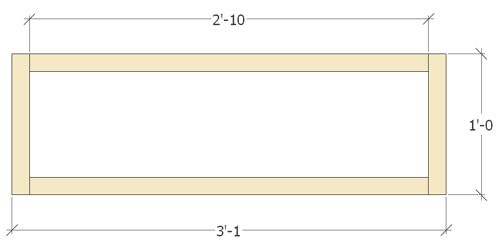
Make them into a frame by attaching the two 1'-0 long pieces to the ends of the 2'-10 long pieces.
Be sure you make this box square. It is important that all pieces fit together tight. A table saw is an excellent way to achieve this, although a circular saw or even a jig saw can be used.
CUT THE BOTTOM
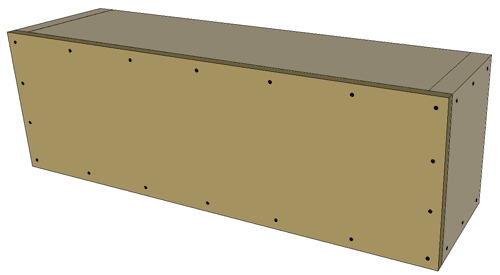
Cut the 3/4" plywood to 3'-1 by 1'-0. This is the same size as the box you just made from the 2x10's.
Attach this piece of plywood to the bottom of the 2x10 frame with 1 5/8" screws.
TRIM THE DECK
Obtain an uncut skateboard deck. There's a couple places you can go for uncuts, SkatePaige.com and drifterskate.com. I've used skatepaige before and they aren't bad and the price is right. Unfortunately it's almost impossible to get them to return your emails or even let you know if your purchase went through.
Another supplier, Drifter Skateboard Manufacturing, really seems to have their stuff together and are quick and professional. To see more, take a look at their video.
To order an uncut blank through Drifter, email Ryan directly and tell him Jason at DIYskate.com sent you.
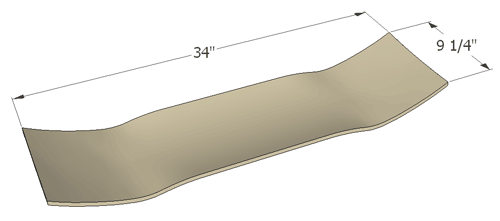
Trim the deck to 9 1/4" x 34" square. This is done by finding the center and measuring out from there. Doing this removes the rough edges and should square the deck for a snug fit in the wooden box.
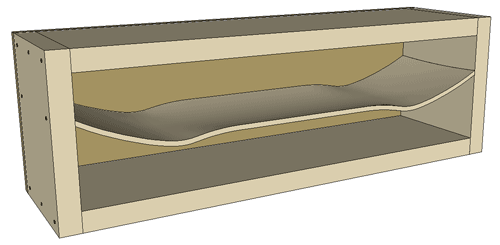
ASSEMBLE
All right, you should have a box and a squared up deck. Before assembly, sand the skateboard deck using progressively finer sandpaper until smooth.
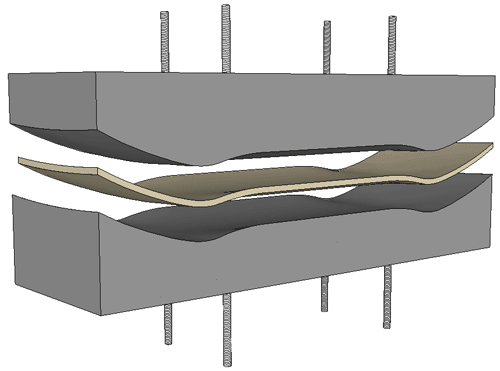
Place the deck on it's side in the center of the box. You should have about 4 1/2" from the center of the deck to the top of the frame and about 3 1/2" from the bottom of the deck to the bottom of the frame.
I wedge the deck into the box then put some caulk in to fill any gaps and help hold it there.
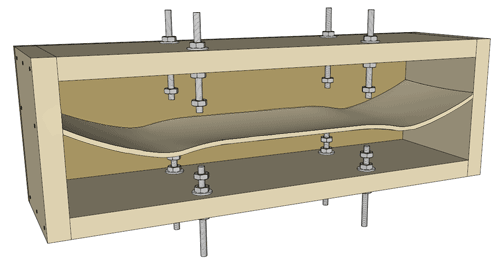
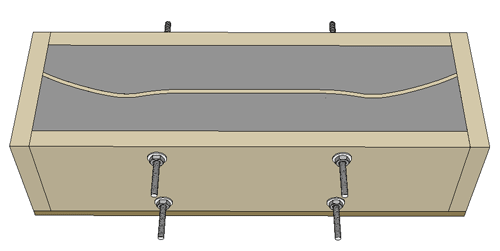
THREADED ROD
Drill four 1/2" holes on the top.
And four on the bottom of the wood form where shown below.
 You will need eight threaded rods, 7" long. Leave about 3" of threaded rod on the inside the box on the top and about 2" on the bottom.
Thread a nut and washer onto each end to bolt the rod into place in the box. Thread another bolt onto the ends of the threaded rod inside the box so the concrete has something to grab on to.
These will allow you to bolt the concrete mold to the press once finished.
You can make a frame from the re-bar and attach it to your threaded rod with wire at this time too. Both the threaded rod and rebar should be available from a home improvement store.
PREPARE THE FORM
You should seal around the deck and where the plywood meets the frame with a caulk. This keeps the concrete mixture from going where it shouldn't.
Coat the inside of the box with WD-40 or similar substance which will allow the concrete to release from the form once dry. Make sure you have good coverage then wipe it down.
MIX
Mix your concrete per the instructions on the bag. It helps to have some help here, hydraulic cement is hard to mix and sets up fast. Most concrete mixtures are temperature sensitive, so take the necessary steps to allow your mold the best chance for success.
FILL THE FORM
With the form on it's back and on a level surface, pour your concrete mixture into the wooden box.
Keep in mind that once filled, the form with concrete will weigh over 175 pounds.
Once full, you will need to immediately vibrate the concrete to release the air bubbles. An assortment of power tools will allow you to vibrate the tiny bubbles to the surface, use your imagination.
CURE
Follow the manufacturers instructions to allow the concrete to cure. You will most likely have to keep the surface wet for a half hour or longer. Once the concrete cures, remove the screws and take apart the form, removing the concrete skateboard mold.
You may have to pry the wood panels from the concrete. Be careful not to chip or crack the concrete.
FINISHED
You're done. If you took all the necessary steps, your concrete skateboard mold should have a smooth, pit free finish and is ready to start turning out perfect decks.
This mold is designed for this press. However, you can purchase a press from an industrial store and adapt it to fit, as seen here, which is also Rocky's mold and press.
Thanks to Rocky for inspiring me write this.
...and thanks to Brian for the computer that this was written on.
